Music Video: Nowhere Man - Get Back
I bought a used Lumix GH4 recently to play a little more with my video ambitions. First experiment was this music video for my friends from Nowhere Man:
All filmed with only one camera, all filmed at one event at Club Waakum.
Getting good with Godot
Thanks to all the hustle and bustle around Unity recently, i once again thought i should check out the Godot Engine. After all similar to Blender, Godot is having a huge update in the shape of a 4-version number. And so far it's been a nice ride!
While there are still a lot of things i would change about it, my learning project comes along nicely. I'm a fan of Turrican 3 / Mega Turrican and the whole Turrican Saga. And making graphics for a learning project is stupid, so i took a couple of Turrican assets i had found somewhere on the net and recreated a sorta vertical slice version of the game. I even got it to run on my Steam Deck and i'm impressed how painless that was:
I especially like how compact and snappy Godot feels in comparison to later versions of Unity. And so far it doesn't fragment its code base to become the "everything for everyone" as Unity.
But learning is always tough and that certainly doesn't change with Godot. Some concepts are great, while others feel like pulling teeth. But yea, i think i'll try my own little project next, this time in 3D. Let's see wether the Vulcan update is kicking ass as claimed. I'd be all for it!
New job once again!
Once again i left a company behind and joined another one. This time it's a major difference though, as i completely left the entertainment industry for now. I'm not leaving game dev, I'm still as fascinated by that topic as ever and i will pursue my passion in private, but from a professional point of view I'm out of games. At least preliminary.
And would you believe, from all fields of business, it's medicine. I'm not a doctor or a nurse in the slightest, instead I'm focusing on artificial dataset generation for AI training. What sounds like a boatload of vapor is merely a fancy description for creating a glorified character creator in Unity. It's pretty much another system as you have in games like Skyrim, just with a focus on artificial intelligence. It's quite a challenging task and I haven't been put in so much control of a project ever, but so far I can only say I love it. Being payed to code and do art in Unity is quite a dream come true for me.
So yea, we'll see what the future holds. I'm still a huge scatter brain about my own projects, but I have more time on my hands to work on them. The fact that I post here is already an attribute to that, as I was able to revamp my homepage project a little. The future looks bright for once!
best
Oliver
Procedural Buildings in Blender
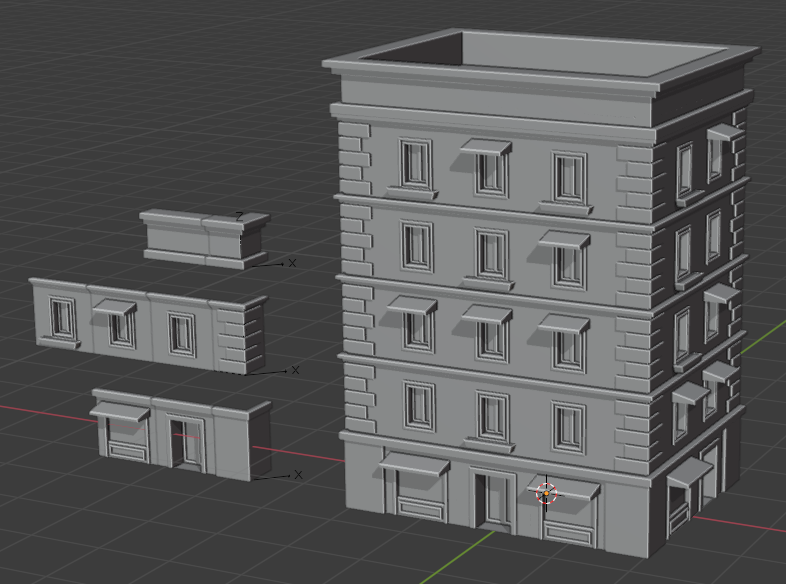
Based on the tutorial of Chong 3D, i have developed a building node group that generates buildings procedurally. I cleaned up most of the creative mess and made it more modular.
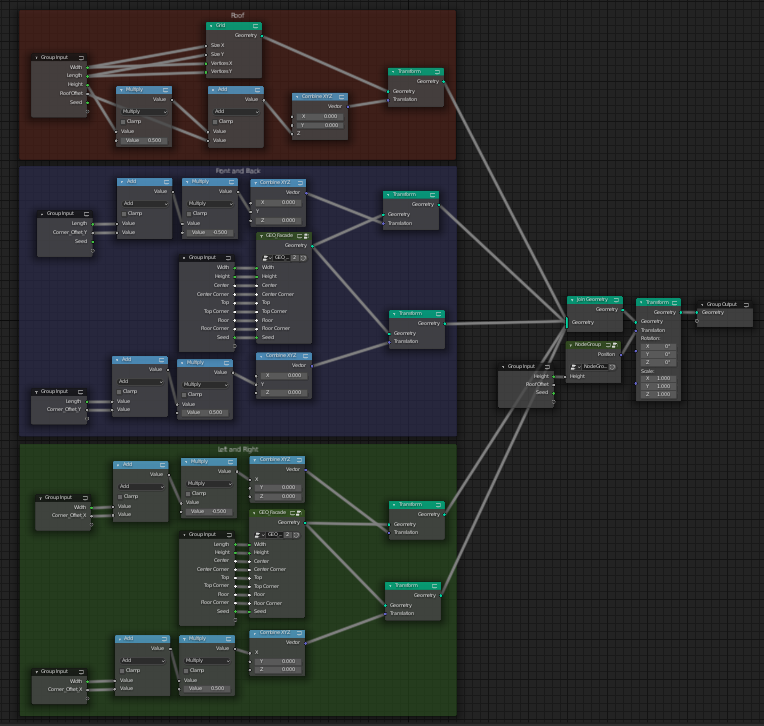
Download: Procedural_Building.zip
Finished my gallery for the 2020 sailing trip through Croatia!
If you want to see what i'm doing when i'm not doing something computer related, check this out:
cheers
Oliver
Halftone Rendering in 3DSMAX
Some weeks ago there was a reddit thread about using a pseudo-halftone-shader in 3DSMAX. The solution there was a little more complex than what i thought it should be, so i played around and quickly ended up with something similar:

This look can be archived quite easily, you don't even need textures or special renderers for it, the standard scanline renderer from 3dsmax is good enough.

Map #1 Fallof
We start with a falloff map, which gives us a black and white version of the light on the material.

Make sure to set it on Shadow/Light
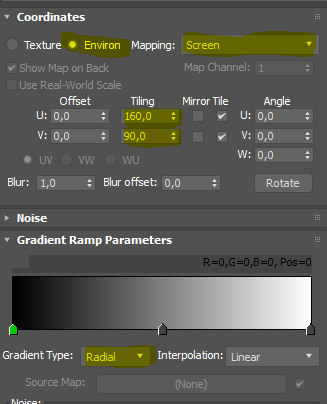
Halftone Dots
Then we need a base for our halftone dots. This is a simple gradient ramp map with some funky settings.
As dots are round, we will use the Gradient Type "Radial".
The dots will not adjust to the objects, but will be projected straight from the camera. As such set the coordinates to "Environ" and the mapping to "Screen". Then adjust the tiling to fit the apsect ratio of your final image resolution and the size of the dots. For 1080p, which is an aspect ratio of 16:9, i went the easy way and set the tiling to 160x90.
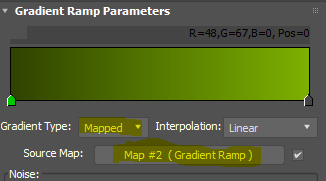
Map #2 Gradient Ramp for threshold
The next map is a gradient ramp, which combines those two maps and transform the resulting grayscale map to a straight black and white. We are using the values from the falloff map, hence set the gradient type to "mapped" and the source map to the falloff.
Next rightclick the middle gradient point and edit the properties. Here you can feed a map only to this one point and that's where we put the halftone dots map in.

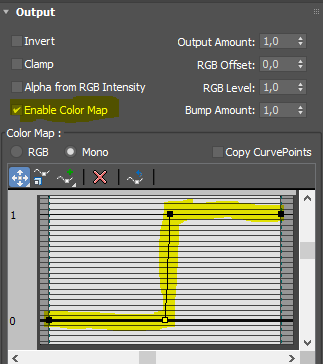
Finally the map needs to be hard-cut to black and white. Open the output tab and enable the color map. Add two points to the map and arrange them something like this:
Now we have the basic halftone dot shader. All we need is some color.
Map #12 Gradient Ramp for Color
This is the easiest and most creative. Create another color ramp and set it to mapped. Add the previous gradient as a source and now select two nice colors for your halftone, kinda like this:
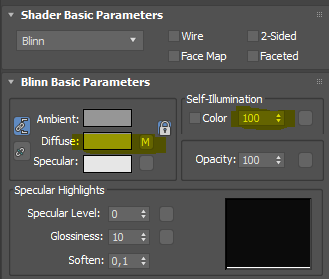
Halftone material
Finally the material to apply onto the object is a basic standard shader. Feed the color map into the diffuse and set Self-Illumation to 100%, as we don't want any "real light" to hit our material.
This concludes this tutorial.
You can exchange the halftone dots for whatever you want, as long as it has some gray tones in it. Also you don't have to duplicate the whole shader tree if you need another shader with a different color. Just feed in the gradient ramp for threshold into a new gradient ramp.
Have fun!
A little substance helper
Substance is an amazing tool, i think this can be considered a fact by now. At least i had a lot of fun tinkering around with substance designer since version 4 and so far it only improved in the right ways. Even the sour acquisition from adobe doesn't really stop my enthusiasm.
A little annoyance though is the boilerplate nodes you usually create before even you can start to experiment. Setup color nodes for metalness and roughness as well as the normal node plus creating a height output, etc... Nothing horrifying, but yea, it's annoying.
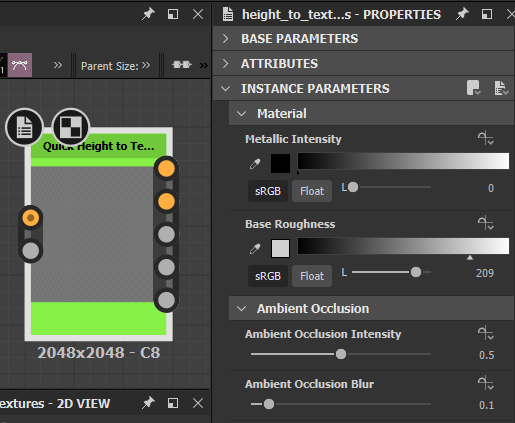
Hence i created a little node that takes care of most of this i call "Quick Height to Textures". It takes a color and a height map and outputs all the rest. Additional parameters for metalness, roughness and ambient occlusion add more variety. Again, nothing amazing, but it shortens the setup time to the juicy experimentation phase.
Maya
Not that that would be a surprise. But even with things that should be standard Maya finds ways to fuck things up. If you export an object as FBX from Maya, it exports the material with it. If you export the same object as an OBJ-file, the .MTL-file (which has the material definitions) uses the shading group names as references! And of course, those have no direct relevance to the material name... Why, Maya, why?
"Bad UI"-Quicky #1
Because it's better to enable the "ignore" of a setting than have the setting itself actually enable something...

What's wrong with "Show in Outliner" and "Use Outliner Color"...? This happens when people don't think before implementing stuff.
Another funky maya quirk!
I'm trying to write a function that selects all top level objects that have a child object. In maya that's tricky. First we need to filter out top level objects
{obj for obj in ls(transforms=True) if obj.firstParent2()==None}
This works okay. But figuring out wether it has children is a tough call in maya, because:
Group objects are transforms without shape nodesShape nodes are the first child of transform nodesHence when you check a node, you cannot simply ask how many childs it has. If you filter for nodes with one or more children, you're basically get all meshes, cameras, lights and so on. If you filter for two or more, you don't get groups with only one child. Anyhow you need a lot of filtering for what should be a really small issue.